
Learn how to use a camping coffee maker to brew the perfect cup of coffee outdoors. Discover tips, tricks, and personal experiences for enjoying a great cup of coffee while camping.
How to Make the Perfect Cup of Coffee Using a Camping Coffee Maker
For many of us, coffee is a non-negotiable part of the morning routine. Whether you’re in the comfort of your home or out in the wild, a good cup of coffee can make all the difference. I still remember my first camping trip when I struggled to find the perfect way to brew coffee outdoors. After a few trial runs and a couple of spills, I learned how to use a camping coffee maker that gave me a delicious, satisfying brew every time. In this article, I’m going to share everything I’ve learned about making coffee while camping, and how you can enjoy the perfect cup in the great outdoors too.
1. Choosing the Right Camping Coffee Maker
The first step in making a great cup of coffee while camping is choosing the right coffee maker. There are several types of camping coffee makers, and your choice will depend on your preferences and camping style. Personally, I’ve tried a few different methods, but I’ll walk you through some of the most popular ones that work great in the wilderness.
Drip Coffee Makers: These are compact versions of the coffee makers you’d use at home. They are easy to use and typically require electricity or a portable battery pack. While they work well for car camping or in locations with power, they might not be the best choice if you're hiking or want a more traditional experience.
French Press: If you’re looking for a simple, effective method, a French press is a great option. It’s compact, easy to use, and doesn’t require any electricity. Plus, it brews coffee quickly and delivers a rich, full-bodied cup of coffee. This is one of my personal favorites for camping.
Percolators: Coffee percolators are a classic choice for camping, and for good reason. They brew coffee directly over a campfire or stove and are very durable. They are ideal if you want a strong, hot cup of coffee, and they bring a little nostalgic charm to the camping experience.
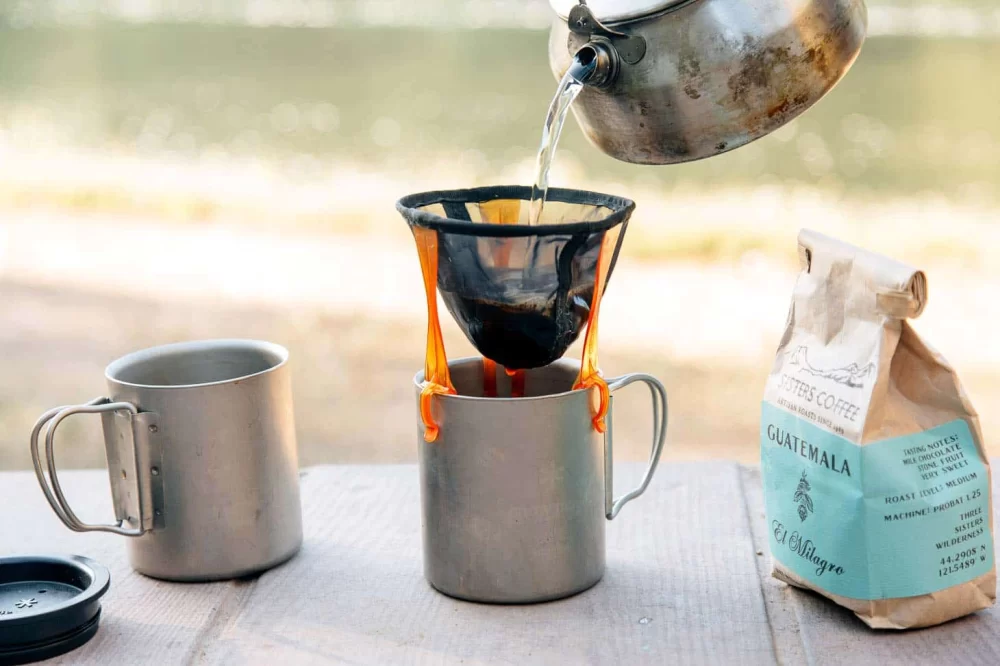
Pour-Over Coffee Makers: If you prefer a cleaner, smoother cup of coffee, a pour-over coffee maker is an excellent option. It’s simple to use and requires no electricity, just hot water. A pour-over set-up is lightweight and perfect for backpacking trips.
2. Preparing the Coffee Grounds
Once you’ve chosen the right coffee maker for your trip, the next step is preparing your coffee grounds. One of the most important things I learned during my camping trips is that the freshness and grind of your coffee are crucial to getting a great brew.
Freshly Ground Coffee: If you have the option, always use freshly ground coffee beans. Pre-ground coffee can lose its flavor more quickly. While on camping trips, I like to bring a small, portable coffee grinder with me, which allows me to grind the beans just before brewing. This makes a huge difference in flavor.
The Right Grind: The grind size of your coffee beans matters more than you might think. A coarse grind works best for camping methods like the French press or percolator, as it prevents the coffee from becoming too bitter. For pour-over or drip coffee makers, a medium grind is usually preferred. Experimenting with grind sizes based on your method can significantly improve your coffee experience.
3. Heating Water for Brewing
One of the challenges I’ve faced when brewing coffee outdoors is getting the water to the right temperature. Too hot, and the coffee tastes burnt; too cold, and it won’t extract the full flavor from the coffee grounds. For the best results, aim for water between 195°F and 205°F. If you don’t have a thermometer with you, just bring your water to a boil and then let it sit for about 30 seconds before pouring it over the coffee grounds.
If you’re using a stove, this is an easy process. If you’re relying on a campfire, you’ll need to keep a close eye on the water to make sure it doesn’t overheat. A camping kettle with a spout can make pouring much easier and more controlled, which is especially helpful when using a pour-over method.
4. Brewing Your Coffee
Now that you’ve got everything prepared, it’s time to brew! The actual brewing process depends on the coffee maker you're using. Here's a breakdown of the steps for some of the most popular methods:
French Press: Add your ground coffee to the press (I usually use about 1 tablespoon per 4 ounces of water), pour in your hot water, stir gently, and place the lid on. Let the coffee steep for about 4 minutes before pressing down the plunger slowly. Pour and enjoy!
Percolator: Fill the bottom chamber of the percolator with water, add your coffee grounds into the filter basket, and place the percolator on your campfire or stove. As the water heats up, it will cycle through the coffee grounds and back into the water chamber, brewing your coffee. Keep an eye on it to make sure it doesn’t boil too vigorously. The longer it brews, the stronger the coffee.
Pour-Over: Place your pour-over filter in the dripper, add your ground coffee, and pour hot water slowly in a circular motion. Allow the water to saturate the grounds fully before adding more water. It’s important to pour in small amounts at a time to ensure a smooth and even extraction.
5. Enjoying Your Coffee Outdoors
After the brewing process is complete, it’s time to enjoy the fruits of your labor. One of the best parts about drinking coffee outdoors is the atmosphere. Whether you're sitting by a campfire, on a mountain peak, or next to a quiet lake, the setting makes the coffee taste even better. I’ve spent many mornings sipping my coffee while watching the sunrise over a mountain range or listening to the sound of a nearby stream.
If you like, you can personalize your cup of coffee by adding milk, cream, sugar, or flavorings like cinnamon or vanilla. Sometimes I like to keep it simple, just enjoying the robust flavor of the freshly brewed coffee with the natural beauty of the outdoors as my backdrop.
6. Cleaning Your Camping Coffee Maker
Cleaning your coffee maker after each use is essential, not just for hygiene but for the longevity of your gear. The last thing you want is a buildup of old coffee grounds or oil that could affect the flavor of your next brew.
After your coffee is finished, clean the coffee maker thoroughly. For a French press, rinse the carafe and plunger with warm water, making sure to remove all the grounds. For percolators, wash the metal components and filter basket after each use. Pour-over filters are typically disposable, so you only need to clean the dripper. Always dry everything completely before packing it away for your next adventure.
Camping coffee makers are a fantastic way to enjoy a comforting, energizing drink while spending time in nature. No matter which method you choose, the key is to keep things simple, be patient, and enjoy the process. There’s truly something special about waking up in the wilderness, brewing a cup of coffee, and savoring the quiet beauty of your surroundings.
Brickhill Bluff Wilderness Campsite
Cumberland Island, St Marys, GA 31558, USA
Visit Location PageHampton Inn & Suites Wiggins
1121 E Frontage Dr, Wiggins, MS 39577, USA
Visit Location Page