
Learn how to choose the right tent repair kit for fabric tears, including key features, material considerations, and real-world repair examples to keep your camping trips worry-free.
- 1 - Understanding Fabric Tears in Tents and Why a Repair Kit Matters
- 2 - Key Features to Look for in a Tent Repair Kit for Fabric Tears
- 3 - How to Choose the Right Kit Based on Your Tent’s Material and Tear Type
- 4 - Real-World Examples of Tent Repairs and Lessons Learned
- 5 - Extra Tips to Maintain Your Tent After Repair
1 - Understanding Fabric Tears in Tents and Why a Repair Kit Matters
When you’re deep in the wilderness, miles away from the nearest store, a small tear in your tent fabric can quickly turn into a big problem. Moisture, wind, and insects can all become unwelcome guests. Choosing the right tent repair kit for fabric tears isn’t just about fixing a hole — it’s about ensuring your comfort, safety, and peace of mind in the outdoors.
Fabric tears often occur from sharp rocks, strong winds, or even accidental mishandling while packing. Understanding the causes helps you anticipate the type of repair tools you’ll need. A well-equipped kit means you won’t be improvising with duct tape when the weather turns bad.
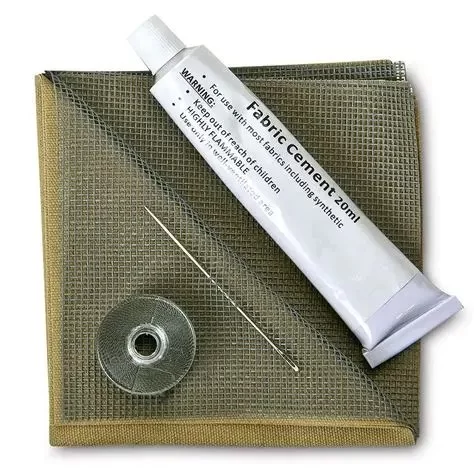
2 - Key Features to Look for in a Tent Repair Kit for Fabric Tears
Not all repair kits are created equal. The best ones offer versatility, durability, and ease of use — even in less-than-ideal conditions. Look for a kit that includes adhesive patches, seam sealers, and fabric glue. Patches should be compatible with different tent materials, including nylon and polyester, and should adhere firmly without peeling in damp or cold conditions.
Many seasoned campers swear by kits that also include mesh repair options for fixing tent screens. A strong, flexible patch ensures the repaired area can still fold and pack without damage. At Pine Cliff Resort, we’ve seen guests save entire camping trips simply because they had a reliable kit at the ready.
3 - How to Choose the Right Kit Based on Your Tent’s Material and Tear Type
Your tent’s material will largely dictate the repair method. For example, silicone-coated fabrics require specific adhesives that standard kits may not provide. Meanwhile, thicker canvas tents often need heavy-duty needle-and-thread solutions, in addition to adhesive patches, to hold up under stress.
If you’re dealing with a straight-line tear, adhesive patches might be enough. But for larger holes or frayed edges, combining stitching with adhesive ensures long-term durability. Matching the repair material to your tent fabric prevents further damage and keeps the tent’s waterproof properties intact.
4 - Real-World Examples of Tent Repairs and Lessons Learned
One hiker at Pine Cliff Resort once arrived with a tent that had a 10-inch tear caused by a tree branch during a windstorm. Instead of heading home, they used a heavy-duty repair kit with matching nylon patches and waterproof adhesive. The repair held for the rest of the season, saving them hundreds on a replacement tent.
Another camper learned the hard way that choosing the wrong adhesive for a silicone-coated flysheet led to the patch peeling off overnight. This shows why reading the fine print and knowing your tent’s fabric is crucial before hitting the trail.
5 - Extra Tips to Maintain Your Tent After Repair
Once your tent is repaired, proper maintenance extends its life. Always clean and dry the tent thoroughly before storage, as moisture can weaken adhesives and invite mold. Check repaired areas periodically for signs of lifting or fraying, and reapply seam sealer when necessary.
Carrying a small, lightweight repair kit on every camping trip is an easy habit that can save you frustration and money. With the right tools and knowledge, even a major tear doesn’t have to end your adventure prematurely.
4 Seasons Campground
2326 County Rd Z, Friendship, WI 53934, USA
Visit Location PageAnthony Chabot Family Campground
Castro Valley, CA 94552, USA
Visit Location Page