
Discover how to use a camping percolator to brew the perfect cup of coffee while outdoors. This guide provides step-by-step instructions and tips for a great camping coffee experience.
Mastering the Art of Brewing Coffee with a Camping Percolator
As a coffee lover, one of the things I look forward to when going camping is the opportunity to brew a perfect cup of coffee in the great outdoors. If you’ve ever tried making coffee while camping, you know it can be tricky. But with the right tool, it’s actually quite simple and rewarding. Enter the camping percolator – the unsung hero of outdoor coffee brewing. If you're looking to elevate your camping mornings and enjoy a hot cup of coffee under the trees, this article will walk you through everything you need to know about using a camping percolator for coffee.
What is a Camping Percolator?
Before diving into the brewing process, let’s first understand what a camping percolator is. A camping percolator is a simple, portable coffee-making device designed for outdoor use. Unlike your everyday drip coffee machine, a percolator brews coffee by repeatedly cycling boiling water through coffee grounds, creating a rich, bold cup of coffee. It’s an excellent choice for camping because of its sturdy construction and ability to function without electricity, relying instead on a campfire or stove to heat the water.
Camping percolators are usually made from durable materials such as stainless steel, which ensures they can withstand the rough conditions of outdoor cooking. They come in various sizes, so you can choose one depending on how many people you need to brew coffee for. Now, let’s get into the fun part – learning how to use one!
How to Brew Coffee Using a Camping Percolator
1. Gather Your Equipment
First things first, gather your camping percolator, some ground coffee, and water. You’ll also need a heat source such as a campfire, camping stove, or even a portable propane burner. The beauty of using a percolator is that it doesn’t require electricity, so you can take it anywhere!
For the coffee grounds, I recommend using a medium to coarse grind. Fine ground coffee can end up being too strong and gritty, while coarser ground coffee works best for the percolator’s brewing method.
2. Fill the Percolator with Water
Start by filling your percolator’s bottom chamber with fresh water. The amount of water will depend on how many cups of coffee you want to brew. A standard camping percolator can typically hold 8 to 12 cups of water. Be mindful not to overfill the water chamber; most percolators will have a line or indicator showing the maximum water level.
3. Add Coffee Grounds to the Basket
Once your water is in the percolator, it’s time to add the coffee grounds. Place the metal filter basket into the water chamber, and add your coffee grounds into the basket. A general guideline is to use about 1 to 1.5 tablespoons of coffee per cup of water, but feel free to adjust this depending on how strong you like your coffee.
Remember, the more coffee grounds you add, the stronger the brew will be. So, if you enjoy your coffee bold, don’t be afraid to pack the basket a little more.
4. Set the Percolator Over Heat
Now it’s time to start brewing! Place the percolator over your heat source, whether it’s a campfire, a portable stove, or a camping burner. If you’re using a campfire, make sure you have a sturdy grate to hold the percolator steady. If you're using a camping stove, just place the percolator directly on the burner. The key here is to control the heat. You want the water to boil gently, not too rapidly.
5. Wait for the Percolating Action
Once the water starts to heat up, you’ll see the percolator begin to “perk” – that’s when the hot water is pushed up through a central tube, and it cascades over the coffee grounds before dripping back down into the bottom chamber. This process is repeated multiple times, and each cycle extracts more flavor from the coffee grounds.
Let the percolator brew for about 5 to 10 minutes, depending on how strong you like your coffee. Keep an eye on it, and you’ll hear a steady “perking” sound as it brews. The longer you let it percolate, the stronger the coffee will be.
6. Check the Coffee
Once the brewing process is complete, take the percolator off the heat. Carefully remove the lid and check the color of the coffee in the chamber. It should be a rich, deep brown color. If it looks a little too light, you can always let it brew for a few more minutes until it reaches the strength you desire.
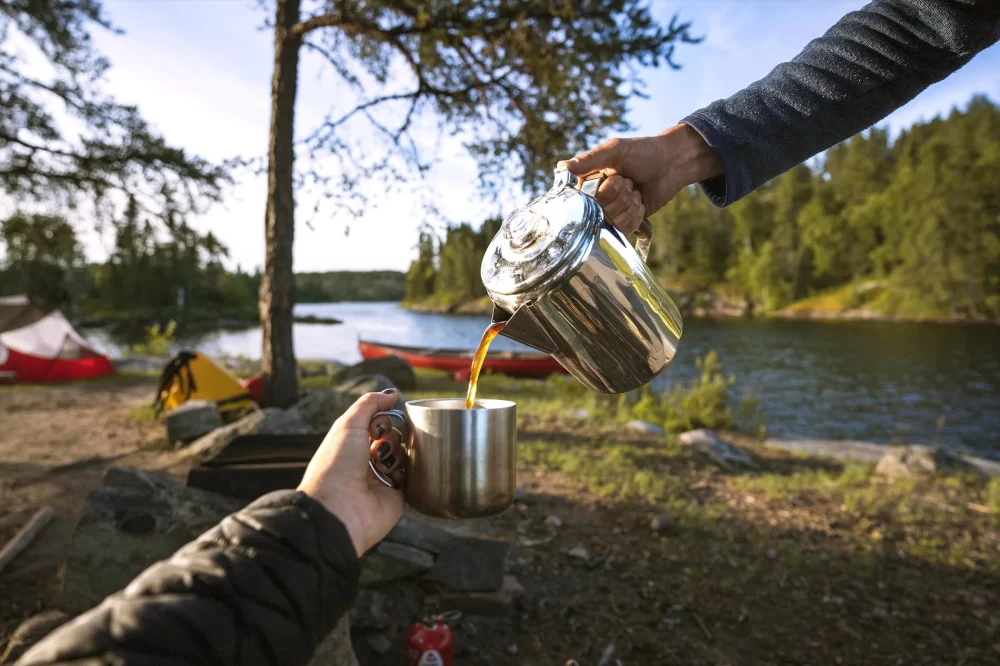
7. Serve and Enjoy
Finally, pour yourself a hot cup of freshly brewed camping coffee! Be cautious when handling the percolator as it will be hot. You can use a sturdy mug, and for an extra touch of flavor, you can add milk, cream, or sugar. If you like your coffee black, you’ll enjoy the smooth, bold taste that the percolator delivers. Whether you’re sitting by the campfire or enjoying the view, there’s nothing quite like a hot cup of coffee in nature.
Tips for Perfect Camping Coffee
1. Use Fresh Water
To get the best-tasting coffee, always use fresh, clean water. Avoid using water that’s been sitting around for too long or water that has an off-taste. This will ensure that your coffee tastes fresh and flavorful every time.
2. Experiment with Different Coffee Beans
If you’re a coffee connoisseur, don’t be afraid to experiment with different beans. Whether it’s a dark roast for an intense flavor or a lighter roast for a smooth taste, choosing the right beans can really make your camping coffee experience stand out.
3. Don’t Rush the Brewing Process
While it may be tempting to rush the brewing process, it’s best to let the coffee percolate at its own pace. Be patient, and you’ll be rewarded with a rich, full-bodied cup of coffee.
4. Keep Your Percolator Clean
After each use, make sure to clean your percolator thoroughly. Coffee oils and grounds can build up over time, which could affect the flavor of your coffee. Clean your percolator with warm water and mild soap after each camping trip to keep it in tip-top shape.
With these tips in mind, you’re well on your way to brewing the perfect cup of coffee during your next camping adventure. A camping percolator is a must-have for any outdoor enthusiast who loves a great cup of coffee, and once you’ve mastered the process, you’ll never want to leave home without it!
Demotte Campground
Forest Rd 616, Fredonia, AZ 86022, USA
Visit Location PageJewell Bay Backcountry Campground
Stoney Trail, Kananaskis, AB T0L 0C8, Canada
Visit Location Page