
Learn how to make a homemade camp stove with this DIY guide. Discover the best designs for efficient outdoor cooking and enjoy your next camping adventure.
How to Make a Homemade Camp Stove: A DIY Guide for Outdoor Cooking
- Why Make a Homemade Camp Stove?
- Materials You Need for a Homemade Camp Stove
- Step-by-Step Guide to Building Your Own Camp Stove
- Alternative Designs for DIY Camp Stoves
- Safety Tips for Using Your Homemade Camp Stove
- Enhance Your Camping Experience at Pine Cliff Resort
Why Make a Homemade Camp Stove?
There’s something incredibly rewarding about cooking your meals outdoors, and building your own camp stove can enhance that experience. Whether you're planning a hiking trip, a weekend camping getaway, or just a day at the lake, a homemade camp stove can be a reliable, cost-effective, and customizable solution for cooking while surrounded by nature.
Not only does making your own stove add a personal touch to your outdoor adventures, but it also provides an opportunity to learn useful survival skills. It’s a practical project for outdoor enthusiasts, and the best part is that you don’t need expensive equipment to create a functional stove. In fact, many DIY camp stoves can be crafted from materials you may already have at home.
Materials You Need for a Homemade Camp Stove
Before you begin building your homemade camp stove, gather the following materials. Depending on the design you choose, you may need different items, but here are some essentials:
- Metal Canisters or Tin Cans: These are often the base for many camp stove designs. They are readily available and can withstand heat. You can use cans from food items like beans or tuna.
- Drill or Punch Tool: To create ventilation holes for your stove, a drill or a punch tool is necessary to ensure proper airflow and combustion.
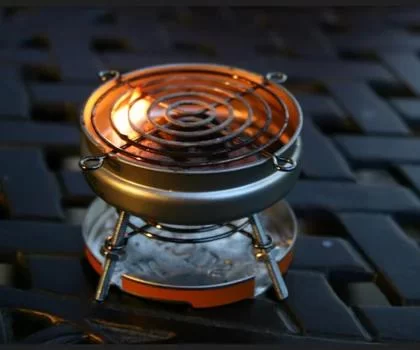
- Metal Grate or Mesh: To hold your pot or pan above the flame, a small metal grate or mesh works perfectly. This can be taken from an old grill or repurposed from other items.
- Hammer and Nails: If you’re using larger cans or building a sturdier structure, these tools can help to secure parts together.
- Optional: Wire Mesh or Aluminum Foil: If you need to make a more compact stove or need a reflective surface, these materials are ideal for directing heat and improving efficiency.
Once you have all the necessary materials, you’re ready to start building. Don’t forget to have safety gloves and eye protection handy, especially when handling sharp metal edges!
Step-by-Step Guide to Building Your Own Camp Stove
Now that you have the materials ready, here’s a simple step-by-step guide to building your own camp stove:
- Prepare Your Can: Start by cleaning your metal can thoroughly. Remove any labels or residue, and make sure the inside is free of any remaining food. If you’re using a large can, you can leave the lid on to create a stove with a chimney effect.
- Drill Ventilation Holes: Using a drill or punch tool, create small holes around the base and sides of the can for ventilation. This will allow air to flow into the stove, aiding combustion and ensuring a hotter flame.
- Cut the Can to Form the Stove Body: Depending on the design, you may need to cut the can into two sections. The bottom section can serve as the stove body, while the top section can be used to create a chimney or lid.
- Add a Grate: To support your cooking pot, create a small grate or metal mesh that fits snugly over the top of your stove. Ensure it’s stable and can hold the weight of a pot or pan.
- Assemble and Test: Once the stove is assembled, light a small test fire using kindling or small twigs. Check the airflow and heat distribution to ensure it’s working effectively.
With these simple steps, you now have a functional homemade camp stove that’s ready for use on your next adventure!
Alternative Designs for DIY Camp Stoves
If you’re looking for different ways to build your homemade camp stove, here are a few alternative designs to consider:
- Rocket Stoves: A rocket stove is a more advanced design that focuses on using less fuel while providing higher heat output. It’s built with a vertical chimney and a horizontal fuel chamber, which makes it incredibly efficient for outdoor cooking.
- Alcohol Stoves: These are small, lightweight stoves that use rubbing alcohol as a fuel source. They are simple to make using aluminum cans and are ideal for lightweight backpacking trips.
- Wood Gas Stoves: These stoves operate by using wood gasification, which means they burn wood more efficiently by forcing the fire to generate gas. This design is perfect for those who prefer using wood over liquid fuel.
Each of these designs can be customized based on the materials available to you, and they each offer unique benefits for specific camping or hiking conditions.
Safety Tips for Using Your Homemade Camp Stove
While homemade camp stoves are fun to make and incredibly useful in outdoor settings, they also come with safety considerations. Here are a few tips to keep in mind:
- Place the Stove on a Stable Surface: Always ensure your camp stove is placed on a flat, stable surface to avoid tipping over and causing a fire hazard.
- Use in a Well-Ventilated Area: Never use your camp stove in an enclosed tent or other non-ventilated spaces. Carbon monoxide can build up quickly, making it dangerous.
- Keep Water Nearby: Always have a container of water or sand on hand to extinguish any flames or small fires that may arise.
- Monitor Your Stove: Never leave your stove unattended while it’s burning. Make sure to supervise the stove at all times to prevent accidents.
Enhance Your Camping Experience at Pine Cliff Resort
If you’re looking for the perfect place to try out your new homemade camp stove, Pine Cliff Resort is a fantastic destination. Located amidst stunning natural beauty, Pine Cliff Resort offers a range of outdoor activities, including camping, hiking, and fishing, all in a peaceful and scenic setting.
Want to experience the best of outdoor living? Click here to book your next camping trip at Pine Cliff Resort and enjoy an unforgettable adventure while exploring the beauty of the great outdoors!
Super 8 by Wyndham Sainte Agathe Des Monts
500 Rue Léonard, Sainte-Agathe-des-Monts, QC J8C 0A3, Canada
Visit Location PageRancho de Cumpas
25609 Potrero Valley Rd, Potrero, CA 91963, USA
Visit Location Page